I wasn't going to start my
Jart until next year, but seeing as how I need to practice a paint technique that I want to you use on another project I thought that I might as well kill two birds with one stone and use the
Jart wing as my practice bed.
In this post I will also cover some of the basics things like making the templates and the feather cutter which helps with cutting the wings.
The idea of making templates seems to deter some people, but it's actually quite easy if you know how. So I'll start at the beginning and go through the whole process. I'll also show you how to cut the foam cores and prepare them for bagging. Later posting will deal with the actual bagging.
Making TemplatesStart off by printing out the templates. They are provided on the
Jart drawing. But if you want something else, there are several programs available for printing Templates. (See the links under "Useful Software" on the right) Cut them out and stick them to some Formica sheet with
Prit glue stick. (You know, it's the "Glue without the Goo") Formica is the same stuff that kitchen counter tops are covered with and I get off-cuts form the local carpentry shop. There are two thicknesses and I try and get the thicker one (about 1,2mm thick). It is harder to cut, but makes a more durable template. There are many other materials that you can use, but choose something that can withstand a bit of heat form the cutting wire and remember that steel or aluminium will also draw heat from the wire, so make them thin if you choose to use those materials.
 There are many ways of making templates and the method I prefer is to use the two template system. One for cutting the top surface and another for cutting the bottom. This system gives you a nice solid base to work on and very little room for error and is much easier to cut wings alone. You could use the single template method, but it does have its pitfalls. The worst is that the template moves and you end up with an untrue wing. Another is that you accidentally get the wire on top on one side and the bottom on the other side.(Especially if you are doing this alone) You can imagine the results. Still another is that the LE tends to get badly melted away as you start the cutting. But ultimately, it's your choice.
Cut the templates out and sand the edges smooth so the cutting wire can slide along the template without snagging. Cutting the templates requires patients and a steady hand. Cut them slightly oversize and sand them down to the line. I normally cut free hand with a stiff blade, but a Scroll saw with a sharp blade works just as well. A smooth surface for the wire to slid on is very important though, as any nicks will cause the wire to snag and make ripples on the wing surface.

In the photos above you will notice that the lead-ins are not straight, but curved. I do this to allows the wire to be heading in the right direction before it reaches the LE and not get stuck in a corner. See photo below. I also provide a lead out section of about 10mm, with a little notch filed about half way along, to catch the wire as it comes out of the foam.
 Cutting Foam Blanks
The next step is to cut the foam blanks. I always cut the foam blanks about 5 to 10mm bigger at the LE. This allows the cutting wire to enter the foam and reach the correct temperature before it actually gets to the LE. (See photo above.)

The easiest way to cut the blanks is to mark out the foam and hang your cutting bow on the lines and let gravity do the work. But it is important that your cutting table is
absolutely level for this, otherwise the edges won't be square. Remember to make a left and a right wing and mark on the foam where the LE is. Sounds silly, but it does help. Believe me!
Put two pegs into the side of your cutting table so they can catch the wire as it exits the foam.

In the photo above, are the two wing blanks after cutting and you can see the cutting bow hanging on the side of the table on the pegs.
Cutting Wing Cores
Next is the actual cutting of the wing cores. I use a home made feather cutter, so I can do this job alone. But the cores can be cut just as easily by hand. It requires two people, one either side pulling the wire through and calling the stations to each other as you go. You will need percentage marks on your templates or on the foam blanks before starting.

A feather cutter works with a swing arm and a series of pulleys around which the pull strings go. Once set up and the heat turned on, the pull strings pull the cutting wire through the foam and over the templates. In the photos below the cutting wire has just exited the foam block. The Swing arm can be seen in the second photo. The cutting bow is suspended above the foam blank which is weighted down so it can't move.

 With the two template method, it is very important to cut the bottom first and then the top and always cut from the LE towards the TE. The reason for cutting the bottom first is that the foam will fall down into the void left by the melting of the foam. Then the templates are changed and the top is cut. Experiment with scrap foam until you get the temperature and technique right.
NOTE: When you are cutting the bottom, you must press the wire down so that it follows the couture of the template. The tendency is for the wire to go straight across because of the pull, so some downwards pressure forces the wire down against the template. Once it has traveled about a third of the way you can let go the downward pressure.
Similarly, a little upwards pressure to help the wire over the first part of the top cut helps prevent any sticking.
Also, don't put too much weight on the swing arm. It must be just enough to pull the wire through the foam without resistance.
The feather cuter is designed for cutting tapered wings. The major cord is attached at 1000mm from the pivot point and the minor cord is attached at the correct percentage. To make calculating the correct percentage easy, I use a very useful piece of software that is freely available on the web called Foam Calc. It can be downloaded from either of these sites. http://www.igull.co.uk/page1/page7/foamcutter.html or http://www.sungun.co.za/black_eagle/foamcalc.exe
 This program lets you set the major and minor cords, the core span and the attach points and then calculates the correct percentage for you. All very simple.
Things like the feather cutter really helps and is a very useful tool to have in your workshop, especially if you intend making more foam core bagged wings.
It is important that the templates and foam are held firmly in place while cutting and once the bottom is cut the templates must be changed so the top can be cut. Use whatever method you prefer to make sure that everything aligns properly so that you get a true wing.
When you have finished you will have a set of foam cores with a razor sharp TE. (See s 2nd photo below) There will be some fine hairs left after the cutting and these need to be removed so that your skins stick to the foam properly. Use a cotton cloth to gently rub them off and then blow them clean. More on bagging in subsequent postings.


The LE will also have to be sanded a bit to get it nice and round. Once that is done, tape the bottom outers together and glue the wing roots together. That is if you want a one piece wing. Place the top outers on top and weigh everything down until the glue sets.

If you have any queries, please leave a comment below.
 After filling the defects with wood filler (the brown stuff) and sanding smooth, I have covered the fuselage with 2 layers of 163 gram cloth. On the sides of the fuselage the cloth overlaps so there are 3 layers there and a 4th patch for local reinforcing where the wing will go through the fuselage.


 This final layer is then water papered as smooth as I can get it in preparation for spraying.

 Then I cut the paper profiles out and glued them to a block of blue foam.
 I fixed my cutting bow to the side of my workbench and hot wire cut the fuselage shape.
 I cut the side profile first and then taped the off-cuts back on and cut the top profile.
 When all the cutting is done you have a lump of foam, that at a wild guess, could possibly resemble a


 Not absolutely perfect, but with a little filler it will be fine. (see the melted notch in the LE below)
 I glued the fin to the fuselage with polyurethane glue. A bit more sanding and a fillet will have the fuselage shaping completed.
 Now I too can strike the "To infinity and beyond" pose.
 Two hours after the wing went into the bag the power went off and I lost vacuum.
  The next morning I opened the bag and removed the wing. It felt okay! Was I going to get lucky?

 What had happened is that I had left the paint on the Mylars for too long before bagging. In fact I had painted the Mylars about a month before. It was also a power failure that had prevented me from bagging the wing that day and I had to leave them
 The adhesion to the paint was so bad in places that big pieces pealed away like
  I use the Mylars and cut the cloth at 45 degrees on newspaper, exactly the same size.
  The Carbon is cut without newspaper and obviously not at 45 degrees.


 Then the resin is dribbled on and squeegeed into the cloth with an old credit card.
 When that is done the uni-directional carbon is placed on top and wet out.
  Some effort is required to remove the nylon threads that hold the carbon strand in place. But with some patience and a little extra resin they come away. Then the extra resin is squeegeed off.
 The wet out skins are then placed onto the foam cores and a strip of Peel ply is taped to the Leading edge of Mylar.
 The whole lot is turned over into the outer cores. What is not shown is the reinforcing ply web that was inserted across the joint and the Carbon carbon cloth, cut in the shape of a diamond that went across the center on both the top and bottom. The 1/3 rd piece of
 Then the other skins are placed on top of that and the peel ply pulled around and taped dawn.
 This sandwich is then placed on some paper kitchen towel.
  Another layer of kitchen towel placed on top of that.
 Now the whole lot goes into the bag. Which is sealed and the air vacuumed out. The Bottom outer core is carefully positioned underneath the bag so that the wing can lay nice and flat with the proper dihedral set. This dihedral was cut into the foam cores.
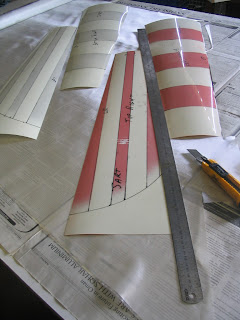
 The Mylar sheets were cut out so that they match the foam cores exactly on all but the TE, which is cut about 15mm oversize. Then the pattern is marked on the reverse side, then turned over and masked with newspaper and clear DC fix shelf paper before spraying with 2K paint.
 I used a special water based release agent on the
 The painted
  The next job is to reinforce the LE of the wing before bagging. To do this I cut two strips of 106 gm glass cloth at 45 degree, laid this on the table and put 4 x 12K carbon tows over them and wet them out and squeegeed the resin through the carbon and into the cloth with an old credit card.
 These strip are carefully laid onto the LE , wrapped around and brushed down with a little more resin. A little resin is brushed onto the foam before the strip is added to help hold them in place.
